


IMPORTING IS THE FIRST STEP TO WORKING ON YOUR PHOTOS IN LIGHTROOM.
I remember the first time that I ever attempted to import photos in Lightroom. I sat there for a few minutes before clicking close and putting it off for another day.
Everything about Lightroom seemed so confusing! And the last thing I wanted to do was to mess anything up, so I did a little bit of research.
Turns out, there are many import options for your photos when you are using Lightroom, and the best options really depend on your goals and where the original photos are coming from (and where you want them to go).
So I wanted to create this simple step-by-step Lightroom tutorial to show you the best import options for YOUR photos and how to make sense of Lightroom.
And while it might seem straight forward, there are a few things to consider before hitting the “import” button and getting to work.
When in doubt, take it slow and really look at your settings before starting the import process. Once you run through the steps a few times, will be become second nature, but it’s always a good idea to work through the process and re-check your work each time (otherwise things can get messy!).
STEP 1, OPTION 1: INSERT YOUR MEMORY CARD READER TO YOUR COMPUTER
I highly recommend buying a simple card reader to plug into your computer for importing photos. It’s quicker than plugging in your camera, less bulky, and it’s more reliable.
These SD card readers are inexpensive and save you a lot of time.
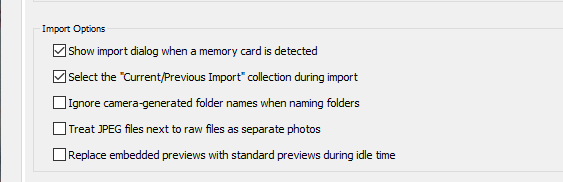
You’ll also save a lot of time if you allow Lightroom to open the import dialog when a card reader is plugged into your computer. To choose this, go to your preferences > import
dialog under the general tab.
STEP 1, OPTION 2: LOCATE YOUR PHOTOS ON YOUR COMPUTER OR HARD DRIVE
If your photos are already on your computer or hard drive and you simply need Lightroom to reference them, then you won’t need be adding them to Lightroom the same way as if you were for the first time.
This is how you will be importing photos that are already on your computer.
If your photos are already in a secure location on your hard drive, then you can point Lightroom in the right direction in order to reference the files (you will be choosing the “move” or “add” option in Step 4 below)
STEP 2: IMPORT DIALOG
Now that your import dialog box is open, you can start the importing process. (If it isn’t opened, you can go to the top menu file>import photos to get started)
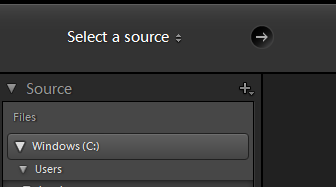
STEP 3: SELECT YOUR SOURCE
This is where you will show Lightroom WHERE on your computer that the photos are currently located and need to be imported from.
When your card reader is hooked up to your computer, it will automatically choose this as your source option, but double check just in case.
STEP 4: CHOOSE HOW YOU WANT LIGHTROOM TO ADD THE PHOTOS
This part is crucial and also a little bit confusing at first, so make sure you understand these options before moving forward.
At the top middle of the import screen, you will see 4 image options: COPY, MOVE, COPY AS DNG, & ADD.
If you are starting from new photos from a memory card, you will most likely only need to use the COPY option, but it’s good to know what they all do.

Copy: This makes a copy of your photo from your memory card, adds it to a new location on your computer or hard drive, and then adds it to your catalog. This is for new photos that aren’t already on your computer.
Move: This option moves photos from a location on your hard drive to a new location and adds it to your catalog. This option is perfect for re-fiiling photos that you have already downloaded on your computer.
Add: This option adds photos to your catalog, but doesn’t move them on your computer. This is perfect for when you already have photos stored the way you’d like them on your computer and you only want to link them to your Lightroom catalog.
Copy as DNG: This will only be an option if you are importing RAW files from your card reader. A DNG file is a universal raw file and can be converted as such during import. Just like the COPY option, this works the same way but also coverts your RAW file into a DNG and stores it on your computer and Lightroom catalog.
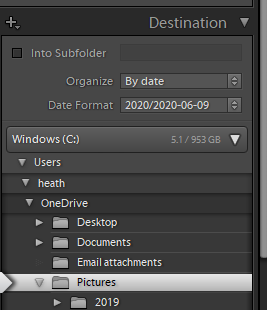
STEP 5: SELECT WHERE YOU WANT THE PHOTOS STORED
Once you have your import options selected, you need to continue to move to the right of the import screen and go down.
First, you’ll need to select WHERE you want these new photos to be stored on your computer. This step is not only handling the location of where they will end up, but it’s also telling Lightroom where it can reference these photos so they can be perfectly synced with your catalog.
From there, you can choose the exact location of where your photos will be stored.

STEP 6: FILE HANDLING, RENAME FILES & IMPORT PRESETS
Once you figure out where you want the photos moved to, there’s many more options to consider, file handling being one of them. You can choose to make a second copy, build smart previews, don’t add duplicates, and add to a collection. These are all personal preferences and aren’t as crucial as other import options.
You can choose to rename your files during import if you’d like (to make it easier to find on your computer later down the road), but this step is completely optional.
There is also an option to apply a preset during import to help you save time editing. If you use the same preset on all of your images, this can be a good option to select as it will save you some time in the develop module.
If you are new to presets and aren’t sure which will look good on these new photos, just leave this blank and worry about using presets when you go to edit.
STEP 7: CHOOSE YOUR DESTINATION
Now that you know where you want your photos stored, you can choose an exact location & folder hierarchy under this menu option.
You can either create a new folder with your photos, or add them to an existing folder. Whatever you decide, make sure you double check your options before clicking on the import button.
STEP 8: IMPORT
Once you have everything selected the way you want, it’s time to import your photos.
Depending on how many photos you are importing and the file sizes, this could take anywhere from a few seconds to a few hours (I’m looking at you wedding photographers). Most of the time it will only take a few minutes, so let it sit and come back when it’s ready before moving over to the develop module to edit.
If in doubt, refer to this quick video to help you understand more about the Lightroom import process:
ONCE YOU HAVE IMPORTED YOUR PHOTOS, YOU ARE NOW READY TO EDIT THEM!
Take a look at all of our Lightroom preset options to help you create a beautiful editing style and save you tons of time in the develop module.

By using these time-saving tools, you can radically reduce the time spent editing your photos – and in some cases, in just one click.
Lightroom was created for the ultimate photography workflow in mind, and presets are just another way to reinforce this way of working quicker.
YOU CAN GET STARTED WITH LIGHTROOM PRESETS RIGHT HERE IN OUR SHOP!


be the first to comment